Heading out the door? Read this article on the new Outside+ app available now on iOS devices for members! Download the app.
If you work at a desk or spend a lot of time commuting, there’s no getting around the fact that you’re on your seat more than you’re on your feet. You’re already aware of the health dangers repeated by medical experts about the lack of movement yet there never seems to be enough hours in the day. That’s where chair yoga poses can help.
Chair yoga is exactly what it sounds like—yoga poses modified for a seated position. Although they originated as support for anyone who has limited mobility for any reason, anyone can practice yoga in a chair to stretch stiff muscles and fascia, experience relief from aches and pains, regain proper posture, help improve blood flow, and draw awareness to the breath in order to regain a sense of calm.
Almost anything you can do on your mat can be done in a chair. The following chair yoga poses can help you be creative in being active even when you’re sitting down. Practice them individually in between meetings or as a series.
What Is Chair Yoga?
Chair yoga originated as a practice that made yoga poses available to anyone experiencing limited mobility. However, anyone who spends long periods of time in a seated position can practice chair yoga poses to help reduce pain from sitting.
Chair yoga provides the same benefits as traditional yoga, such as building strength, flexibility, and balance, and helping reduce stress and depression. Because it is a gentle and therapeutic variation of yoga, chair yoga for seniors is often a recommended form of exercise, as chair yoga puts less pressure on joints. People in wheelchairs or those with physical disabilities may also benefit from the added support chair yoga offers.
Tips for Getting Started With Chair Yoga
Not every chair will provide the support you need for chair yoga poses. Here’s what to keep in mind:
- Chair yoga poses require a stable, sturdy seat. If you are at home, a kitchen chair or almost any armless chair that isn’t too cushy will work. Although some companies sell yoga chairs that are marketed specifically for chair yoga, it’s not necessary to buy a specialized chair.
- Find a chair that allows you to sit with your feet on the floor with your shins and thighs at a 90-degree angle. Placing blocks under your feet may help.
- Some chair yoga poses are wheelchair accessible. Be sure to lock the wheels to keep them from moving during your practice.
13 Chair Yoga Poses You Can Do Anywhere
Most chair yoga poses require you to sit forward on the seat—away from the back of the chair—so that you are able to move more freely. But the chair back can also act as a prop to give you more support and leverage, especially in twisting postures. As in any yoga class, you may also want to keep blocks or a strap (or belt) nearby when practicing chair yoga poses to support you in finding a version that works for you.
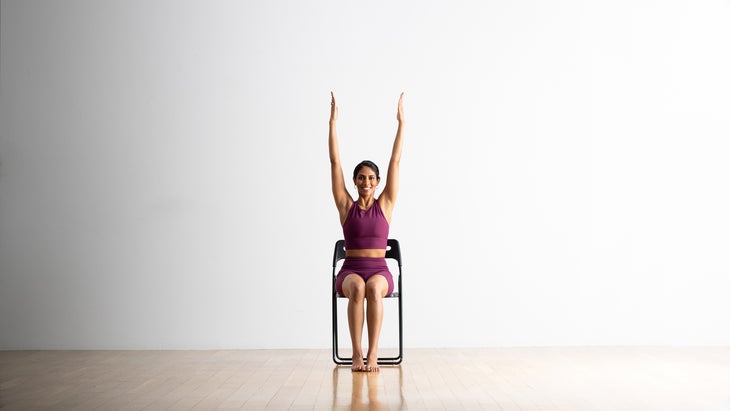
1. Upward Salute Pose (Urdhva Hastasana)
Upward Salute is a great way to stretch your arms and shoulders while lengthening your spine.
- Sit with your back a few inches from the back of the chair. Lengthen your spine, reaching the crown of your head up and gently releasing your tailbone toward the seat. Lift your chin parallel to the floor.
- Place your feet flat on the floor with your big toes touching and a little space between your heels. (If you experience lower back pain, practice with your feet hip-distance apart. Place your feet on blocks if they don’t reach the floor.) Root down with your big toe mounds, your heels, and the outside edges of your feet.
- Inhale, draw your shoulders back, soften your front ribs, and raise your arms overhead with your hands shoulder-distance apart and palms facing each other. If your shoulders are tight, take your arms wider than your shoulders.
- Reach your fingers toward the ceiling and keep your gaze straight ahead. If you prefer, you can touch your palms together and bring your gaze to your thumbs.
- Keep your arms strong. Stay here for several breaths. Release your arms.

2. Cat Pose (Marjaryasana)
As in the more familiar version of Cat Pose practiced from hands and knees, you want to simultaneously round your back as you draw your chin toward your chest. This helps improve flexibility in the spine and stretches the shoulders.
- Sit on the chair with your feet hip-width apart.
- Rest your hands on your knees.
- On an exhalation, round your spine and lower your chin toward your chest.
- Take several relaxed breaths here. On an exhalation, slowly roll your head up and return to the original position.
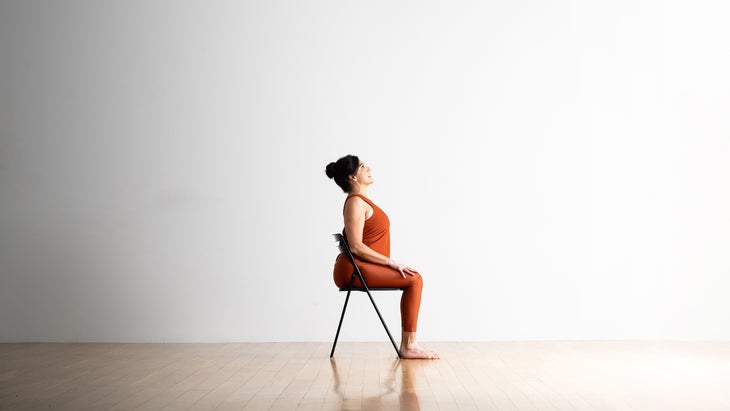
3. Cow Pose (Bitilasana)
You might recognize Cow Pose from the back-to-back sequence of Cat Pose and Cow Pose that is often cued on all fours in a yoga class. This seated version is still a backbend in which you lift your chest and your gaze. Similar to Cat Pose, it can help you improve flexibility in the spine.
- Sit on the chair with your feet and knees hip-width apart. Let your hands rest on your thighs or knees.
- Inhale and arch your back. Lengthen along the back of your neck and your lower back to create a long, even curve.
- Lift your chin and sternum, broaden your collarbones, and allow your shoulders to fall back and away from your ears.
- Take several breaths. Slowly lower your chin and return to a neutral spine.
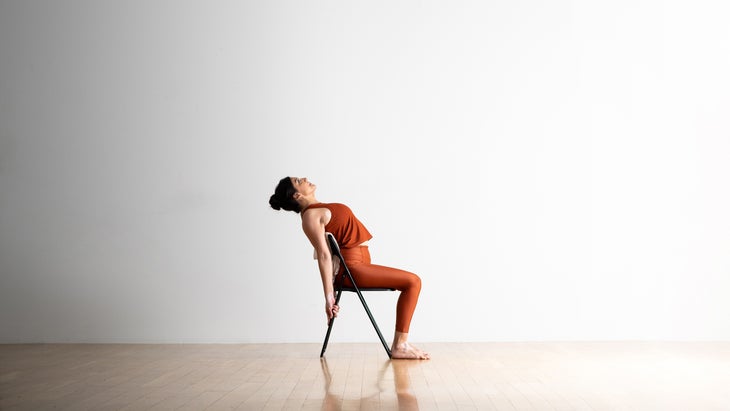
4. Camel Pose (Ustrasana)
You’ll experience stretching and strengthening of the chest, upper back, and shoulders in this seated version of Camel Pose.
- Sit on the chair with your feet hip-width apart.
- Inhale and arch your upper back, allowing your shoulder blades to touch the back of your chair. (It’s fine if your shoulders do not touch the back of the chair; simply focus on arching your back and lifting your gaze without straining.)
- Lift your chin and sternum, broaden your collarbones, and allow your shoulders to fall back and away from your ears.
- If it’s comfortable, reach your arms back to grasp the legs of the chair. Rotate your arms externally so that the inside of your elbows face forward.
- On your next inhalation, lift your chest, allowing your rib cage to expand and creating a long, even curve through your mid and upper back. You can press your feet into the floor to engage your legs and core.
- Take several breaths. To release the pose, release your hands, tuck your chin, and come back to your original seated position.
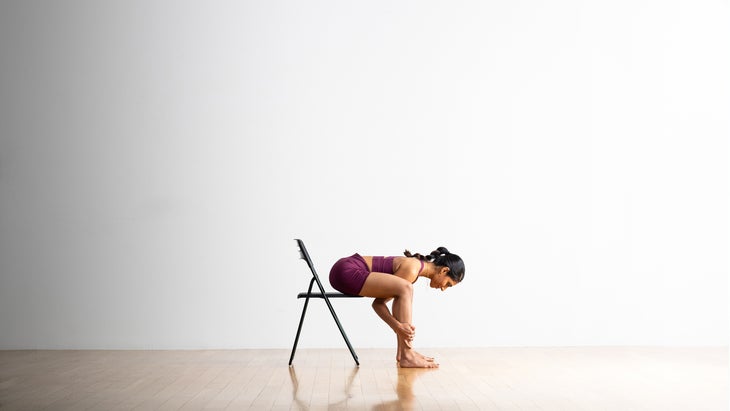
5. Happy Baby Pose (Ananda Balasana)
In this seated version of Happy Baby, you can keep your spine straight or allow your back and shoulders to round forward as you relax your neck.
- Sit toward the front edge of the chair with your feet on the floor, a little wider than hip-width apart.
- Reach the crown of your head up and draw your tailbone down to find length in your back.
- As you exhale, fold forward at your hips and bring your belly between your thighs. You may choose to widen your legs to create more space for your torso.
- Inhale and reach down between your legs and grasp your outer shins, ankles, or feet.
- Gently pull your torso down between your thighs, lowering your body toward the floor.
- Take several breaths. To release the pose, let go of your grip and engage your core muscles as you lift your head, neck, shoulders, and torso to return to your original seated position.
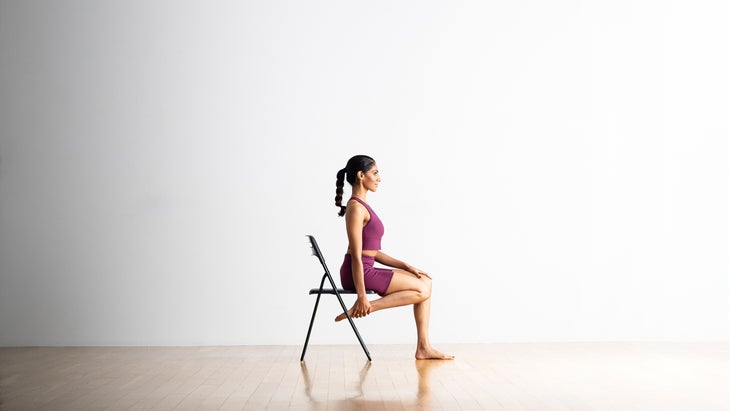
You can more easily control the intensity of the stretch in your quads in the chair version of King Arthur’s Pose. (Photo: Andrew Clark)
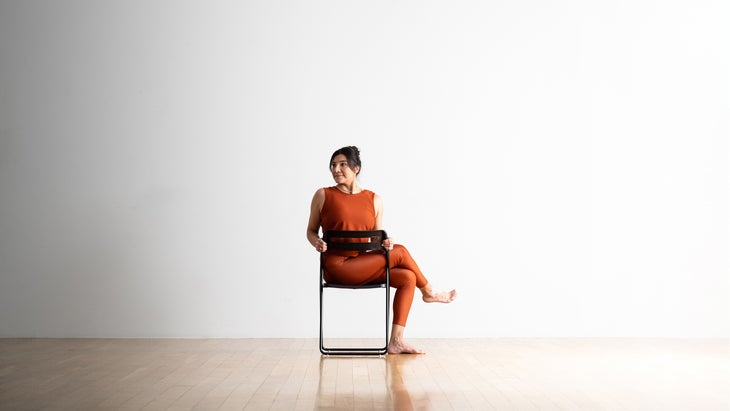
6. King Arthur’s Pose
In King Arthur’s Pose, you can alter the stretch in your quadriceps by changing the position of your ankle. Bring your ankle closer to your hip for a more intense stretch, or farther away for a milder stretch.
- Sit in a chair with your sit bones in the middle of the seat. Shift your weight to the right side of the seat and place your feet flat on the floor with your knees hip-width apart.
- Keep your right thigh connected to the chair seat as you bend your right knee, lift your foot off the floor, and point your toes toward the back of the chair.
- Reach down with your right hand and grasp your ankle. Gently lift it toward your body until you feel a strong stretch in your quadricep and the front of your shin. (If you can’t reach your ankle, loop a strap or towel around your foot.)
- Take several breaths. Lower your foot and come back to your original seated position. Repeat on the opposite side.
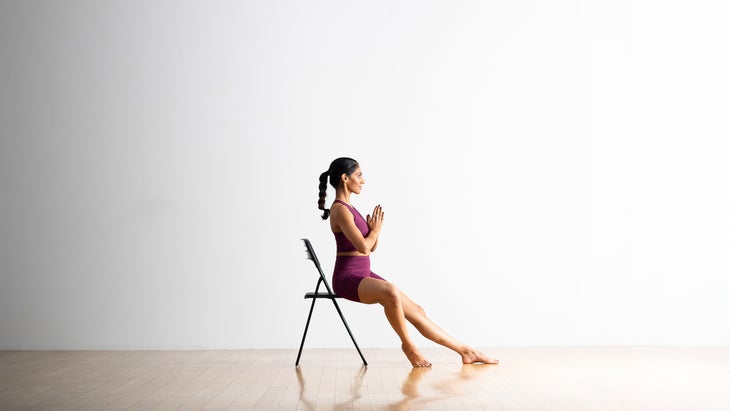
7. Tree Pose (Vrksasana)
Tree Pose is intended as a stretch for the hips, a strengthening of the hamstrings, as well as a balancing pose. It delivers all of the above in the seated variation.
- Sit toward the front edge of the chair. Inhale deeply, lifting your chest, and exhale as you draw your shoulder blades down your back. Look straight ahead at a steady gazing spot.
- Extend your left leg straight out in front of you. Flex your foot or point your toes toward the floor.
- Open your right leg out to the side, keeping your knee bent and your foot or toes on the floor.
- Place your hands in anjali mudra, or prayer position, at your heart or stretch your arms overhead.
- Take several breaths. To release the pose, plant your right thigh back onto the seat, and place both feet firmly on the floor. Come back to your original seated position. Repeat the pose on the other side.
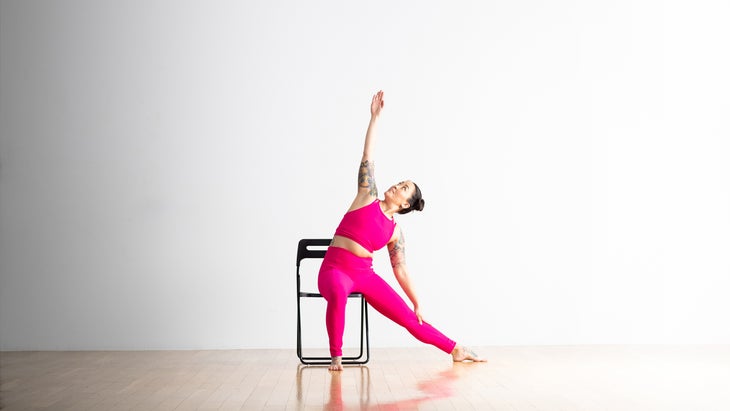
8. Extended Triangle Pose (Utthita Trikonasana)
Extended Triangle Pose stretches the thighs, hips, lower back, and torso, which makes it a great stretch for muscles that are stiff from prolonged sitting. Listen to your body and turn your gaze anywhere that feels most comfortable, whether straight ahead, at your lifted arm, or down at your leg.
- Sit so that your body is on the left side of the chair and your left thigh clears the seat.
- Extend your left leg straight out to the side. Firm your thigh and straighten your leg as much as possible.
- Inhale and raise your arms straight out from your shoulders and parallel to the floor. Keep your shoulder blades wide and your palms down.
- Exhale and lean your torso to the left, bending from your hip joint. Reach your left arm out and down toward your extended leg, resting your left hand on your shin or thigh. Reach your right arm toward the ceiling.
- Keep your head in a neutral position or turn to look either at your right hand or down at the floor.
- Take several breaths. Inhale and come back to sitting. Shift your body to the right side of your chair and repeat the posture on the other side.
9. Bound Angle Pose (Baddha Konasana)
Taking your feet farther away from you in Bound Angle Pose creates a less-intense stretch if keeping your feet closer to the chair feels too much. Don’t force the stretch.
- Sit toward the front edge of the chair so that your buttocks are supported but your knees clear the seat.
- Open your legs wide, so that your knees point away from each other.
- Sit tall, pressing your shoulder blades against your upper back to lift through your sternum. Reach the crown of your head toward the ceiling.
- Keep your knees wide as you bring your feet together. Open your feet as if you were opening the pages of a book, keeping the outer edges of your feet together.
- Place your hands on your thighs and gently press your thighs away from each other.
- Take several breaths. Slowly release and come back to your original seated position.
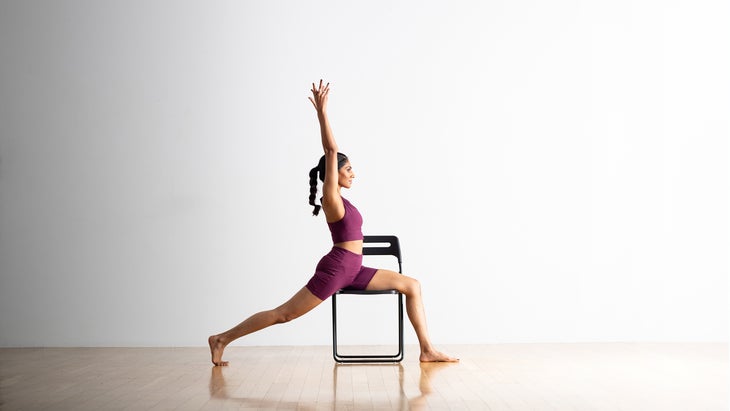
10. High Lunge
This seated High Lunge stretches your thigh muscles and strengthens your hips, knees and ankles.
- Sit on your chair facing the left side of the room so that your thighs are fully supported. Shift toward the front of the chair so that your right thigh clears the seat.
- Keeping both hips facing forward, extend your right leg straight back. Plant the ball of your foot on the floor. Engage your right thigh by pushing it up toward the ceiling to straighten your leg as much as possible. Make sure your left knee is stacked on top of your right ankle.
- Inhale and reach your arms toward the ceiling, keeping your shoulders wide and your arms aligned with your ears.
- Take several breaths. To release the pose, release your arms and bring your right leg forward.
- Shift in the seat to face the right side of the room and repeat the posture on the other side.
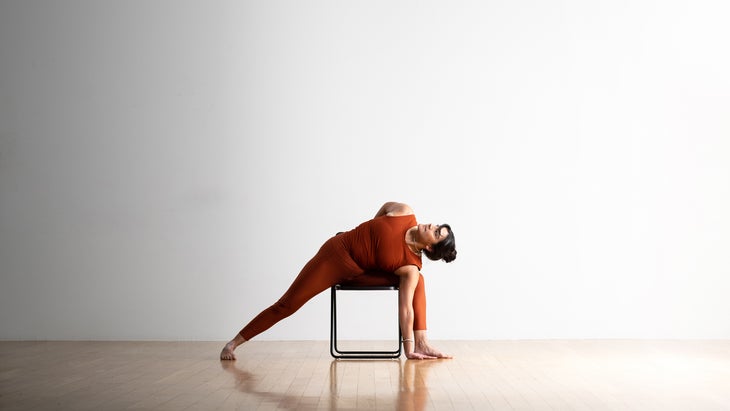
11. Extended Side Angle Pose (Utthita Parsvakonasana)
Extended Side Angle Pose stretches your extended leg while opening your shoulders, chest, and hips. If it’s not comfortable, your bottom hand doesn’t need to be on the floor. Use a block or another prop you have at home to bring the floor to your hand instead. You’ll still benefit from a side stretch.
- Sit facing the left side of your chair so that your thighs are fully supported on the seat. Shift yourself to the right, near the front side of the chair, so that your right thigh clears the seat.
- Extend your right leg back. Open your hips toward the front of the chair. Straighten your right leg and place the bottom of your right foot on the floor with your toes facing forward.
- Lean your torso toward your left knee, hinging at your hips to bring your left arm toward the floor. Place your left fingertips on the ground or on a block, so your arm and shin are parallel.
- Reach your right arm toward the ceiling. Extend it alongside your right ear, palm facing the floor, or bend your right elbow and reach back to grasp the back of the chair.
- Rotate your torso to turn your chest toward your top arm. Turn your head to look toward the ceiling or keep your gaze forward if more comfortable.
- Take several breaths. To release the pose, press yourself up with your left hand and bring your right leg in to return to your seated position.
- Turn on the chair to face the right side of the room and repeat the posture on the other side.
12. Half Lord of the Fishes (Ardha Matsyendrasana)
Half Lord of the Fishes stretches your outer thighs and hips while lengthening your spine. Don’t use force here. Instead, twist until you feel a stretch and pause for several breaths. Sit facing the side of your chair so that you are fully supported on the seat.
- Cross your right leg over your left leg.
- Inhale as you lengthen your spine and lift both arms toward the ceiling.
- Exhale and twist to the right as you bring your hands down to grasp the back of the chair.
- Turn your head to the right, looking past your right shoulder. Make sure you don’t strain your neck.
- Take several breaths. To release the pose, inhale and reach your arms up and then exhale and unwind your body. Place both feet on the floor.
- Turn to the left side of your chair and repeat the posture on that side.
13. Marichyasana III
In seated Marichyasana III, the twisting motion allows for a stretch in your shoulders, hips, and lower back.
- Sit with your spine supported by the back of the chair. Lengthen your spine and gently release your tailbone toward the seat.
- Place your feet on the floor hip-width apart.
- Lift your right knee and draw it toward your chest. Pace your right foot on the seat of the chair as close to your right sitting bone as possible.
- Inhale and lengthen your spine. Exhale and twist to the right. Grasp your right knee with your left hand or wrap your left elbow around your right knee.
- Drape your right arm over the back of the chair and either grasp the chair back or clasp your hands together.
- Take several breaths. Lengthen on each inhalation and gently twist a bit more with each exhalation.
- To release the pose, lower your arms, unwind your body, and place your right foot back on the floor. Repeat on the other side.
This article has been updated. Originally published July 3, 2022.
Learn more about how yoga can transform your everyday life and enhance your connection to your body, mind, and soul by subscribing to our newsletter!